(Note in regards to Para Ballum speed update.) Tag: Visual edit |
No edit summary |
||
| (18 intermediate revisions by 7 users not shown) | |||
| Line 10: | Line 10: | ||
Before moving onto Armor specific damage resistances, "strike zones" should be discussed. Strike Zones define how much damage an Operator (or any enemy) will take based on where they were hit. Each Operator has three Zones: the Head, the Body, and the Legs. |
Before moving onto Armor specific damage resistances, "strike zones" should be discussed. Strike Zones define how much damage an Operator (or any enemy) will take based on where they were hit. Each Operator has three Zones: the Head, the Body, and the Legs. |
||
| − | *Head: Shots to the head are most explicitly one-shot kills for any Operator. Only in the rare case that other factors lessen the damage (obstacles, distance, etc.), or for [[Caveira|Caveira's]] Luison pistol, |
+ | *Head: Shots to the head are most explicitly one-shot kills for any Operator. Only in the rare case that other factors lessen the damage (obstacles, distance, etc.), or for [[Caveira|Caveira's]] Luison pistol, where a headshot will not kill its target. |
*Body: Shots to the body will deal their advertised damage at 100% effectiveness. Originally, the arms were part of the Legs' strike zone (thus were called the Limbs' strike zone), but have become a part of the upper body to become a part of the Body strike zone. |
*Body: Shots to the body will deal their advertised damage at 100% effectiveness. Originally, the arms were part of the Legs' strike zone (thus were called the Limbs' strike zone), but have become a part of the upper body to become a part of the Body strike zone. |
||
*Legs: Shots to the legs will deal reduced damage, at 75% effectiveness. The damage hitbox is from the waist down. |
*Legs: Shots to the legs will deal reduced damage, at 75% effectiveness. The damage hitbox is from the waist down. |
||
| Line 33: | Line 33: | ||
===Speed Ratings=== |
===Speed Ratings=== |
||
| − | ''NEEDS TESTING: Due to the [[Rainbow_Six_Siege_patches/Patch_3.2.0|Para |
+ | ''NEEDS TESTING: Due to the [[Rainbow_Six_Siege_patches/Patch_3.2.0|Para Bellum update]], speeds need to be retested and remeasured.'' |
As evident, Operators with heavier Armor Ratings are slower than Light Armored Operators. Light Armored Operators move at about 5 meters per second. In a comparison, Medium Armored Operators move at 90% of that speed, which is around 4.5 meters per second. Heavy Armored Operators only move at 75% of a Light Armored Operator's speed, at around 3.75 meters per seconds. |
As evident, Operators with heavier Armor Ratings are slower than Light Armored Operators. Light Armored Operators move at about 5 meters per second. In a comparison, Medium Armored Operators move at 90% of that speed, which is around 4.5 meters per second. Heavy Armored Operators only move at 75% of a Light Armored Operator's speed, at around 3.75 meters per seconds. |
||
| Line 41: | Line 41: | ||
**For Blitz, who is a Medium Armored Operator, his speed reduction is much more grave, reducing his speed multiplicatively by 20% to 71% (~3.6mps). As with the other shield Operators, unequiping the shield does not change the speed. |
**For Blitz, who is a Medium Armored Operator, his speed reduction is much more grave, reducing his speed multiplicatively by 20% to 71% (~3.6mps). As with the other shield Operators, unequiping the shield does not change the speed. |
||
*For Blackbeard, his speed is reduced to about 62.5% (~3.125mps), only when he has his Rifle Shield out; taking out his pistol or dequipping the Shield will restore his Medium Armored Speed of 90%. |
*For Blackbeard, his speed is reduced to about 62.5% (~3.125mps), only when he has his Rifle Shield out; taking out his pistol or dequipping the Shield will restore his Medium Armored Speed of 90%. |
||
| − | |||
==Armor for Operators== |
==Armor for Operators== |
||
| Line 52: | Line 51: | ||
*[[Capitão]] |
*[[Capitão]] |
||
*[[Hibana]] |
*[[Hibana]] |
||
| + | *[[Maverick]] |
||
====Defenders==== |
====Defenders==== |
||
| Line 80: | Line 80: | ||
*[[Lion]] |
*[[Lion]] |
||
*[[Finka]] |
*[[Finka]] |
||
| + | *[[Nomad]] |
||
| + | *[[Nøkk]] |
||
| + | *[[Amaru]] |
||
| + | *[[Kali]] |
||
====Defenders==== |
====Defenders==== |
||
| Line 89: | Line 93: | ||
*[[Valkyrie]] |
*[[Valkyrie]] |
||
*[[Lesion]] |
*[[Lesion]] |
||
| + | *[[Mozzie]] |
||
| + | *[[Warden]] |
||
| + | *[[Goyo]] |
||
| + | *[[Wamai]] |
||
===Heavy Armor=== |
===Heavy Armor=== |
||
| − | Heavy Armored Operators are slow, but are the most heavily equipped, taking 80% of a weapon's full damage or 64% if |
+ | Heavy Armored Operators are slow, but are the most heavily equipped, taking 80% of a weapon's full damage or 64% if wearing [[Rook|Rook's]] Armor Plates. More suited to holding down areas with their better durability, these Operators are better used for straight, one-on-one engagements and defending locations. |
====Attackers==== |
====Attackers==== |
||
*[[Montagne]] |
*[[Montagne]] |
||
*[[Fuze]] |
*[[Fuze]] |
||
| + | *[[Gridlock]] |
||
====Defenders==== |
====Defenders==== |
||
| Line 104: | Line 113: | ||
*[[Mira]] |
*[[Mira]] |
||
*[[Maestro]] |
*[[Maestro]] |
||
| + | *[[Clash]] |
||
| + | *[[Kaid]] |
||
==Video== |
==Video== |
||
Revision as of 11:02, 12 November 2019
Armor and Speed is a feature in Rainbow Six Siege that determines the Operator's stat classification. There are three different types: Light Armored, Medium Armored, and Heavy Armored.
Overview
Armor and Speed is a determining factor for an Operator's likely play style, although they do not need to abide by it. If they are Light Armored, they are geared towards quick plays, such as hit-and-run or rush tactics. On the other end of the spectrum, Heavy Armored Operators are more obligated in hunkering down, as they perform better at defending a position than moving with their slower speed.
As a note, some sources of damage are not affected by Armor Rating, such as damage from gadgets (eg. the shock attack from Twitch's Shock Drone), along with fall damage. Bleedout time does not change either between Operators of different Armor Ratings.
Strike Zones
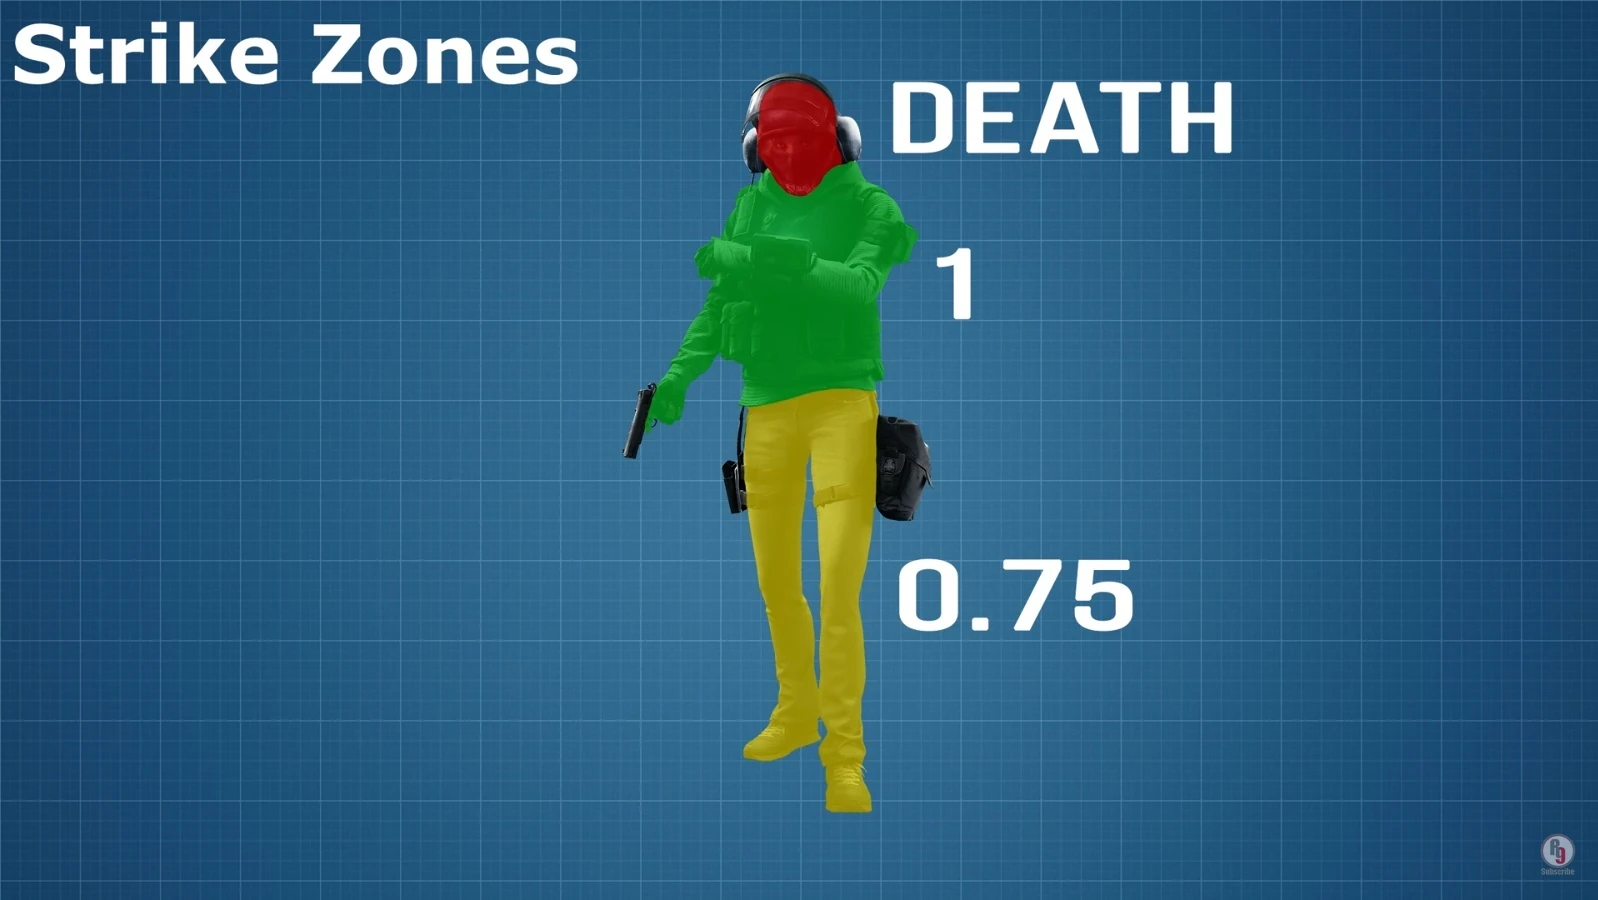
Before moving onto Armor specific damage resistances, "strike zones" should be discussed. Strike Zones define how much damage an Operator (or any enemy) will take based on where they were hit. Each Operator has three Zones: the Head, the Body, and the Legs.
- Head: Shots to the head are most explicitly one-shot kills for any Operator. Only in the rare case that other factors lessen the damage (obstacles, distance, etc.), or for Caveira's Luison pistol, where a headshot will not kill its target.
- Body: Shots to the body will deal their advertised damage at 100% effectiveness. Originally, the arms were part of the Legs' strike zone (thus were called the Limbs' strike zone), but have become a part of the upper body to become a part of the Body strike zone.
- Legs: Shots to the legs will deal reduced damage, at 75% effectiveness. The damage hitbox is from the waist down.
Damage Multiplier
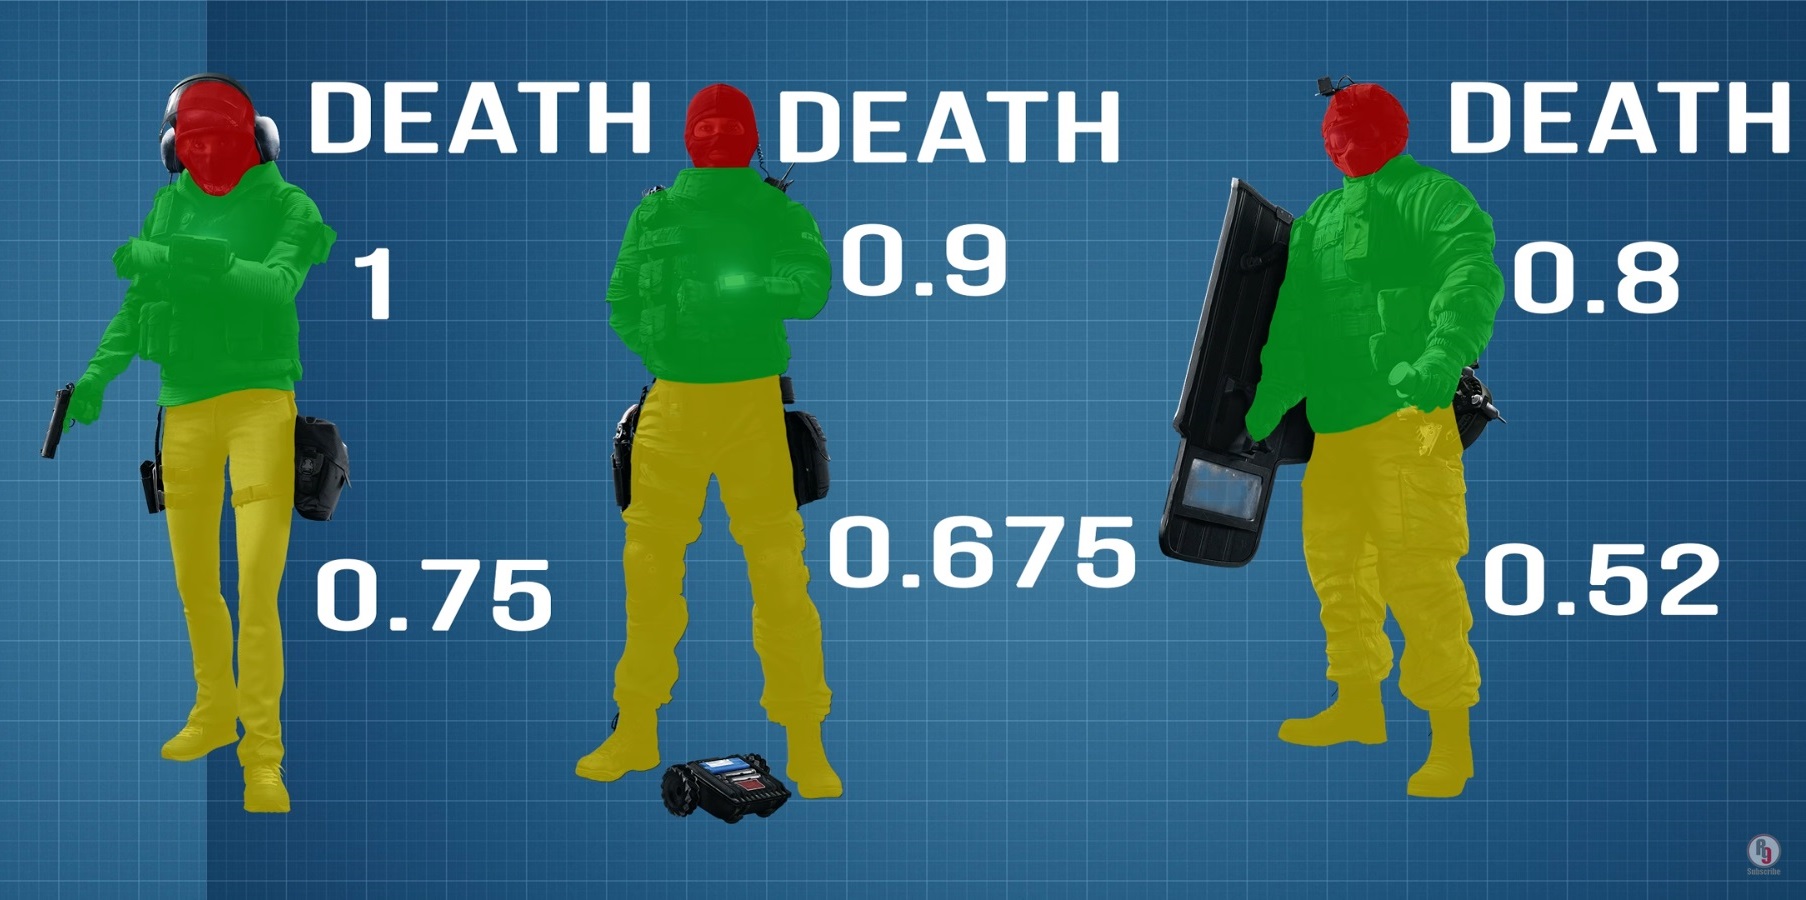
Based on their Armor Rating, an Operator will have a given damage multiplier upon their body.
- Light Armored Operators will have a 100% damage multiplier, meaning that they have 0% damage resistance.
- Medium Armored Operators have a 90% damage multiplier, meaning that they have 10% damage resistance.
- Heavy Armored Operators have a 80% damage multiplier, meaning that they have 20% damage resistance.
These damage multipliers will stack on top of the Strike Zone multipliers.
Rook's Rhino Armor
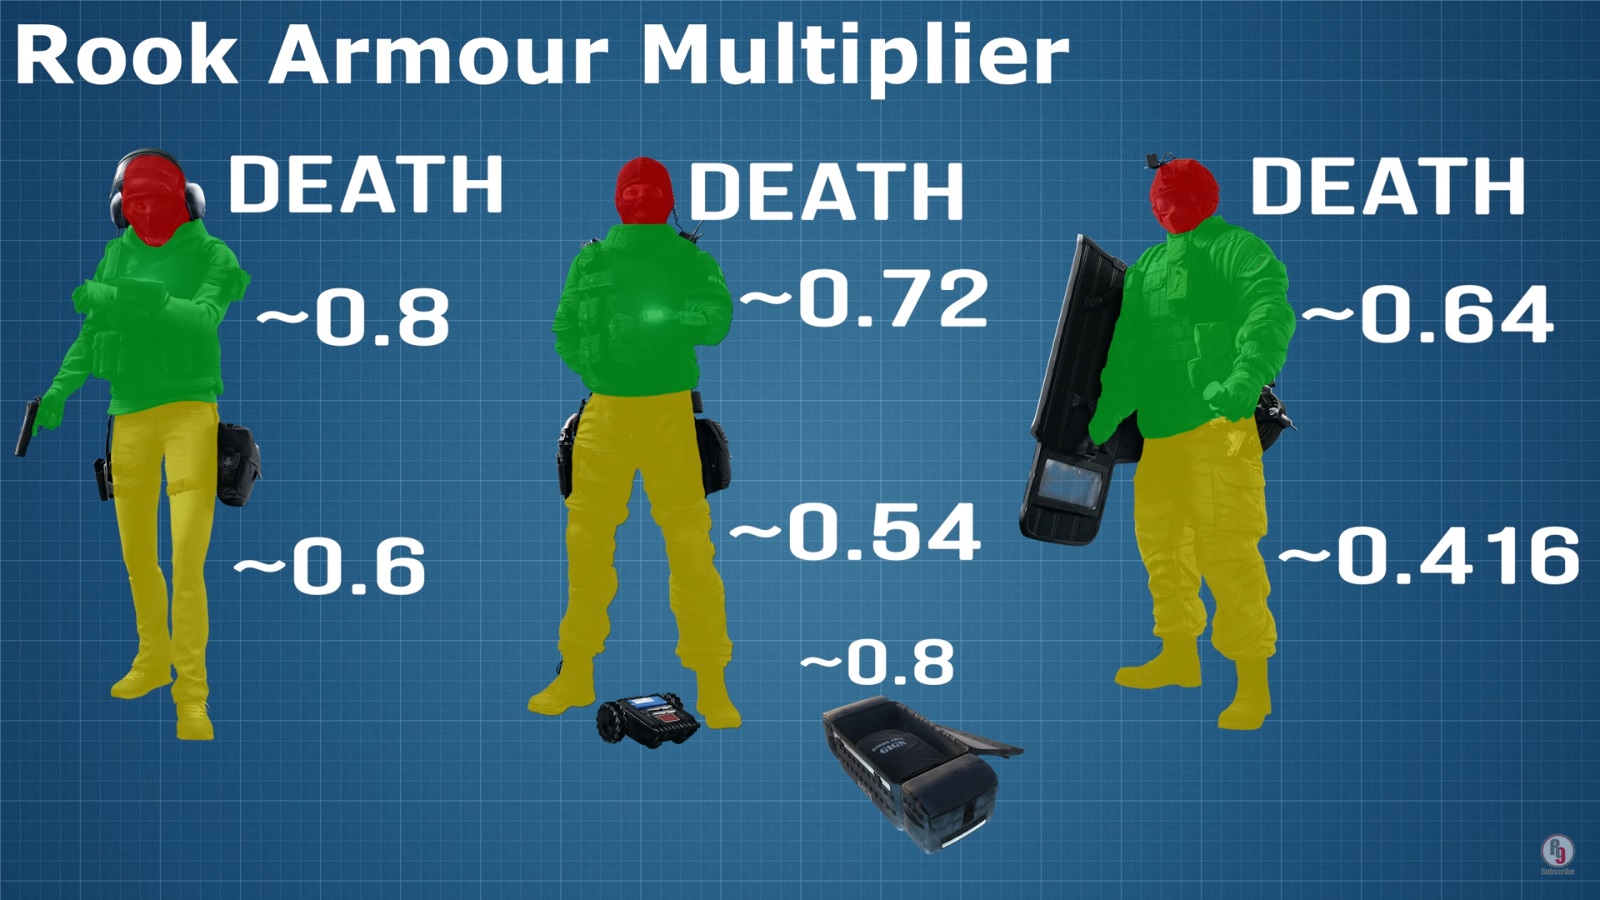
Rook's Armor Plates on an Operator has a similar effect to raising their armor rating by one, and a bit more.
They offer around 20% more protection on top of the Operator's Armor multipliers, along with preventing the Op from being outright killed (guaranteeing DBNO), even at low health. The Operator's Speed Rating however is not affected by the Armor Plates.
Read more on Rook's Page.
Speed Ratings
NEEDS TESTING: Due to the Para Bellum update, speeds need to be retested and remeasured.
As evident, Operators with heavier Armor Ratings are slower than Light Armored Operators. Light Armored Operators move at about 5 meters per second. In a comparison, Medium Armored Operators move at 90% of that speed, which is around 4.5 meters per second. Heavy Armored Operators only move at 75% of a Light Armored Operator's speed, at around 3.75 meters per seconds.
Shields and Blackbeard's Rifle-Shield will reduce their Operators' speed.
- For Montagne and Fuze, who are both Heavy Armored Operators, their speed reduction is minor, reducing their speed by 10% multiplicatively to 67.5% (~3.375mps), even if the shield is not out.
- For Blitz, who is a Medium Armored Operator, his speed reduction is much more grave, reducing his speed multiplicatively by 20% to 71% (~3.6mps). As with the other shield Operators, unequiping the shield does not change the speed.
- For Blackbeard, his speed is reduced to about 62.5% (~3.125mps), only when he has his Rifle Shield out; taking out his pistol or dequipping the Shield will restore his Medium Armored Speed of 90%.
Armor for Operators
Light Armor
Light Armored Operators take the full damage of a weapon but can traverse the map the fastest. Specializing in movement over defense, these Operators have an affinity to hit-and-run and roaming tactics.
Attackers
Defenders
Medium Armor
Medium Armored Operators are the Jack-of-all-Trades of the three, as they take 90% of a weapon's full damage and traverse the map at a decent rate. Specializing in versatility above all else, these Operators are suited for the changing, dynamic tides of Siege.
Attackers
- Sledge
- Thatcher
- Thermite
- Twitch
- Blitz
- Glaz
- Buck
- Blackbeard
- Jackal
- Ying
- Zofia
- Dokkaebi
- Lion
- Finka
- Nomad
- Nøkk
- Amaru
- Kali
Defenders
Heavy Armor
Heavy Armored Operators are slow, but are the most heavily equipped, taking 80% of a weapon's full damage or 64% if wearing Rook's Armor Plates. More suited to holding down areas with their better durability, these Operators are better used for straight, one-on-one engagements and defending locations.
Attackers
Defenders
Video

| |||||||||||||||||||||||